ADF Tutorial Chapter 2: Basics of ADF Business Components
Business Components allow us to easily map the database object and extend on it with business logic, validation and so on.
The idea behind Business Components it to abstract the data layer from the view layer. This is a key concept in the MVC pattern. Business Components will expose the interface to the view layer by using an Application Module which contains View Object. Those view objects will contain a specific usage of the data layer.
If this explanation sounded a little abstract, no worries. I will explain this later on with some examples and everything will become clear.
If you didn't start with chapter 1, please have a look at it because you need to the data model to be able to follow this tutorial.
In this chapter you will find answers to following questions:
- What are entity objects
- What are view objects
- What is an application module
- How do we create business components from tables
- How to use the application module to test and populate the data model.
Creating Business Components
Open up JDeveloper and make sure the vieApp is open.Right click on the vieModel project and select New. In the categories list select ADF Business Components and select Business Components from Tables in the items list:

Press OK to start the wizard.
In the first step of the wizard we need to select the connection to use to connect to the DB. In chapter 1 we have created the vieDB connection so we better select this one don't you think?

In this case I am connecting to an Oracle Database but if you for example would connect to MySQL you would have to change the SQL Flavor to SQL92.
When you press the OK button you get the actual Business Components from Tables wizard which contains of 6 steps.
In the first step we have to specify which tables we want to use in our application. In the Name filter you can specify a filter to select specific tables. Suppose your tables start with a prefix you could specify that prefix in the Name Filter.
In our case we leave the field as is and just press the Query button. This will populate the Available list on the left. Because we want to use all the tables, shuttle them to the right.
In the Package field on top of the wizard we specify in which packages the Entity Object are created. It is a good practice to separate Entity Objects and View Objects so we are going to specify vie.app.model.entities as the package:

In the next screen we can specify which view object we want to create. View objects are objects we use to expose the data to our view layer. I will explain the difference between VO's and EO's a little later so bare with me for now...
The screen is similar as the first screen but in this step we specify which of these objects need to have a VO representation. As a guideline, it's safe to say that if you want to use that table in your view layer, you will need to have VO representation. If the table is a cross table for a many-to-many relation, you don't exactly need to have a VO.
For our VIE application, all of the tables are proper entities so we want to use them in the view layer so shuttle them all to the right.
During the creation of EO's we have specified the vie.app.model.entities packages so because we are creating VO's we are going to change the package to vie.app.model.views.

Click next to open the Read-Only View Objects section. Read-only VO's are... Well... Read-only. You will only be using them to lookup or display information. Changing data will not be possible.
Because we have selected all the available object during the previous step, nothing is available in this step for us to create RO View Objects. Makes sense because we want to be able to insert and update data in all of our selected objects.
So it's safe to click next without doing anything in this step.
In the 4th step we need to specify the Application Module. Now, the AM is a very important piece of work. It is the interface to our view layer. You might have build whatever mastery you're up to in the View Objects or Entity Objects, as long as you don't expose those object through the AM, the view layer will not be able to see and use it.
It's also really important to give your AM a proper name that is meaningful for the interface. In our case we can call it ViewModule because it contains the interface for the VIE data model. Also change the package to vie.app.model.
If you have a very big application with different domains than it makes sense to have a package to group your AM's together but in this case it doesn't.

Now we can continue with the next step. There we can create a diagram which will show us the relations between the different objects. Normally you will use other tools to model your data layer so to be honest, I never used the diagram functionality of JDeveloper... So just press Next.
The next screen shows a nice overview of the resources that will be created by JDeveloper:

Let's go over the types of resources and explain them in depth:
Entity Object, View Object and Application Module
Entity Objects: These are basically your 1 to 1 representation of a database table. Each table in the database will have 1 and only 1 EO. The EO contains the mapping between columns and attributes. EO's also contain the business logic and validation. These are you core data services. They are responsible for updating, inserting and deleting records.Let's take a closer look at one of the generated Entity Objects. Open Course in the entities packages.
In the general section you notice some general information like name, package and the schema object where it is based upon:

The Attributes tab displays the actual mapping between attributes and columns:
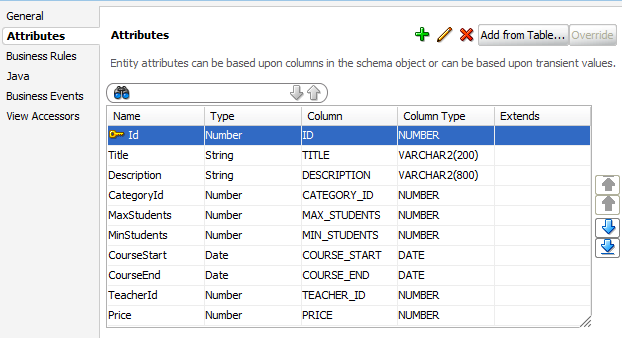
The mapping has following fields:
- Name: contains the name of the attribute we expose in our data model.
- Type: defines the data type of the attribute in our application.
- Column: specifies the column to which we want to map the attribute with
- Column Type: contains the type of the column in the database
View Objects: View Object are technically seen "just" SQL queries. Nothing more... VO allows us to build those queries in declarative way. If you are feeling fancy you can just go into expert mode and start writing your own query, no problem with that but the intention of a VO is to allow users to build the query in a declarative way. A VO can be compared with a view in the database. It's a stored query.
Let's have a closer look at one of the view objects . This will help understand you understand the idea of a VO. Open CourseView from the views package. When you open the Entity Objects tab you will see the selected Entity Objects.

When you open the Attributes tab, you will see a list of selected columns and what their alias is in the query:

At this stage it's important to point out the relationship between EO and VO. Although I am talking about a DB query so you might ask why do we need those Entity Objects?
The answer is simple: The attributes in the View Objects are actually coming from the Entity Object. In the end the VO will generate a query but you basically build a VO by selecting which EO need to participate in the VO and which attributes of those EO you want to use.
That's why you have the Entity Usage column so you can see the relation between VO and EO.
In the query tab you can clearly see the query that will be generated for the VO. At this stage we don't need it and just use it for information purpose. In later stages we might use it.
Application Module: This is the controller of your data layer. It is responsible for keeping hold of the transaction. It exposes the data model to the view layer. You expose the VO's through the Application Module. This is the abstraction of your data layer which you want to show to the outside word.
Because the AM is your interface, it makes sense to look how that interface looks like, right? Let's open VieModule in the model package and take a look at the Data Model tab.

As you can see on the right hand side. This is your data model that will be exposed to your application.
We will work with these artefacts later on. This was just the introduction and to show you which types of artefacts we have in business components so don't worry if you don't grasp it all yet. You soon will!
Some people might have noticed that JDeveloper has created a few more resources besides Entity Objects, View Objects and an application module. It also created associations and view links. These resources are the mapping of the foreign keys in the database. Notice that in the Data Model you have a hierarchy. For example CourseView has a child which is SubscriptionView. This is based upon the foreign key between Courses and Subscription in the database.
When you create EO's, a foreign key will be translated into an association in our model. It defines the type of relation and who is the master and child as well as how the visibility of the association looks like.
A similar concept exists to identify relations between view objects. These are called view links. These are almost identical as association except that a view link is based upon attributes defined in the view object. It can also be based upon an association.
Here's a short summary of what we've learned so far:
Entity Objects: representations of tables
Association: Relations between EO's. Representations of foreign keys
View Objects: Logical model
View Links: Relationships between view objects
Application Model: interface to your application
Later on in the tutorial we will work very closely with these objects so you will learn to understand them even better.
Testing the data model
One of the things I always notice when I give a WebCenter or ADF course is that people don't always know how to properly test the data model. When you are working with an MVC framework it can be very difficult to identify in which layer the problems occurs. If you are accessing information through a web application and some weird NullPointerException occurs with a stack trace that does not seem familiar. How do you find out where the problem originated from? Is it the view layer? The controller? Maybe the data layer but there you have an AM, VO and EO who can each contain java code so there are many point of failure so it's quite important to have a good understanding on how to test your application.I often see people building complex data models and test them in the view layer. When something goes wrong they start debugging it, losing hours of work just to find out they made a typo in the attribute name in the view object... If the data model had been tested properly this would have been solved in a matter of minutes.
Just right click on your application module and select Run. You will get a basic user interface that will map the data model in the application module:

When you double click on CourseView1 you will see the records. Currently there are no records in the database so the fields will be disabled:

If you press the Plus sign in the toolbar you will be able to add records. Let's try it:

Click the commit button to save it to the DB.
Oh no what happened... The application is crashing on me and I didn't do anything wrong. Well apparently we did:

Constraint "COURSE_TEACHER_FK" is violated. Makes sense because I specified 1 for teacher ID but there is no teacher with ID 1. There are no teachers at all!
This is an easy error to figure out but trust me, people will lose a lot of time when this error occurs in the view layer. They will make the assumption that the teacher exist and think that the value from the view layer is not properly propagated to the data layer so they will try to figure out why. If instead, they did a simple test in the application module they would immediately see what is wrong.
I'm maybe explaining this a little too hard but I cannot stress how important this is. ALWAYS use the application module to properly test your data model. Write unit tests to test the application module.
Populating the database
Another cool thing we can do with the AM is populating the database. AS you notice we have a nice CRUD screen by just running the AM. This give us an easy interface to easily add some records to the database.Let's do this know.
Before we can continue you have to press the Rollback button to clear the Course records. Otherwise the error will keep on nagging about the constraint and we cannot continue.
Open the Category and create a few records:
1 Oracle Fusion Middleware
2 Project Management
3 Software development
4 Languages
5 People Skills

Don't forget to press the Commit button to commit the changes to the DB! Everything should be fine and we don't get an error.
Let's do the same and add some teachers:
Only Firstname, Lastname, Birthday and hire day are mandatory. The rest can be left empty:

I bet you can come up with a few good names. Make sure there are at least 3 or 4 teachers in the system. Just so you get a hang of it.
Again, don't forget to commit your changes!
We are also going to add a few countries so when we do specify an address for a teacher we can specify the country:
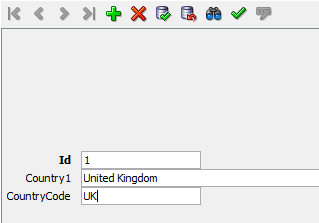
Also make sure you have at least 4 to 5 countries.
That's it. Courses , teachers and subscription are not required for now. We will add them later on.
That concludes the second part of the tutorial. It gave an introduction to business components and how to create them.
The next chapters will extend this model and use it to build the web interface to manage courses and so on. So stay tunes for the next parts...
No comments:
Post a Comment